User model Look-Up-Tables
The user models are introduced in the Robotran tutorial. As a consequence you should have read the user models part of the tips & tricks.
The type lut1D and lut2D are dedicated to handle a look-up-table in your multibody system. Such table may be used to compute of the force in an actuator whose behavior is not given by a function but by data points:
The 1D look-up-tables interpol a unique value based on the value of 1 parameter:
y=f(x).The 2D look-up-tables interpol a unique value based on the value of 2 parameters:
z=f(x, y).
1D look up table: File definition
The content of the file have to respect the following:
The first line (maximum 256 characters): the human-readable description of the file content. This line is skipped by the software, but must be present (even if empty).
The second line (an integer): number of point in the look-up-table.
The third line (floats separated by space): the coordinate of the table.
The fourth line (floats separated by space): the value of the function.
For example the file below implement the look-up-table representing
y=x^2. This simple txt file will be saved as
x_pow_2.MbsLut1D.
This file computes y=x^2 between -5 and 5 at each integer value
11
-5.0 -4.0 -3 -2 -1 0 1 +2.0 3 4 5
25.0 16.0  9  4  1 0 1  4   9 16 25.0
The coordinates of the data points must be strictly increasing.
2D look up table: File definition
The content of the file have to respect the following:
The first line (maximum 256 characters): the human-readable description of the file content. This line is skipped by the software, but must be present (even if empty).
The second line (two integers separated by space): number of
x(callednx) theny(calledny) evaluated values.The third line (
nyfloats separated by space): the coordinatesyof the table.The next
nxlines (each line isny + 1floats separated by space): the coordinatexthen thenyfunction valuez
For example the file below implement the look-up-table representing
z=x^2 + y. This simple txt file will be saved as
x_pow_2_plus_y.MbsLut2D.
This file computes z=x^2 + y for x between (-5;5) and y between(0;3)  at each integer value
11 4
0 1 2 3
-5.0 25 26 27 28
-4.0 16 17 18 19
-3 9 10 11 12
-2 4 5 6 7
-1 1 2 3 4
0 0 1 2 3
1 1 2 3 4
+2.0 4 5 6 7
3 9 10 11 12
4 16 17 18 19
5 25 26 27 28
The coordinates of the data points (x and y) must be strictly
increasing.
User model creation
In the user model window, add a new parameter (remind that the Parameters must be created in an existing User Model), for this example we will name our user model my_user_model. In the Parameter properties change the Type to lut1D in the dropdown list.
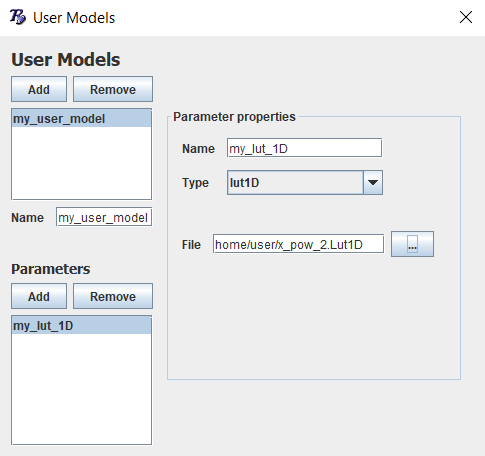
User model gui, for 1D look-up-table
In this example we will name this parameter my_lut_1D.
In the File field, set the file (including the path) to the table to be loaded, which is in our example x_pow_2.Lut1D.
For a 2D look-up-table use:
Type: lut2D
name: my_lut_2D
file: x_pow_2_plus_y.Lut2D
If you use the user functions as Python modules (default
behavior), then a MbsLut1D instance is created in
MbsData.user_model["my_user_model"]["my_lut_1D"].
If you use the user functions from a C-library (advanced
behavior), then the look up table is loaded and saved in the
memory whose address is stored in
MbsData.user_model["my_user_model"]["my_lut_1D"].
1D look up table: Usage
Please note that the look up table should only be interpolated in the domain defined by the data points. If called outside the domain the current behavior is a linear extrapolation, but this behavior is not guarantee.
Any function that has MbsData as argument can access to the table
(meaning all user functions of the project).
Interpolating the table
If you use the user functions as Python modules (default behavior) you access and use the table as follow.
# Retrieve the table instance:
my_lut = mbs_data.user_model["my_user_model"]["my_lut_1D"]
# Interpol the table at 1.5
value = my_lut.linear_interpolation(1.5)
# Print the result
print("interpolation of y=x^2 at x=1.5 : {:g}\n".format(value))

# Or alternatively
value = mbs_data.user_model["my_user_model"]["my_lut_1D"].linear_interpolation(1.5)
If you use the user functions as part of a C-library (advanced behavior) then:
Write the user function following the C version of this tutorial.
You can access only access and modify the table from the main.py file (as it is the only file written in Python) and use it as follow.
# Loading the mbs file has been done with prj_functions_c="SU" for example
mbs_data = MBsysPy.MbsData("../dataR/my_mbs.mbs", prj_functions_c="SU")
# Create a MbsLut1D instance from the adress stored in the user model
my_lut = MBsysPy.MbsLut1D(pointer=data.user_model["my_user_model"]["my_lut_1D"])
# Interpol the table at 1.5
value = my_lut.linear_interpolation(1.5)
# Print the result
print("interpolation of y=x^2 at x=1.5 : {:g}\n".format(value))

# Or alternatively
value = MBsysPy.MbsLut1D(pointer=data.user_model["my_user_model"]["my_lut_1D"]).linear_interpolation(1.5)
Changing the table in memory
During the computation you can change the file to be stored in the user model. This requires to firstly delete the current table in memory, and then load and assign the new one in the user model.
It is not required to free the memory of the newly loaded table as it will be freed with the user models.
If you use the user functions as Python modules (default behavior)
just do the following in any of your file. Then all functions
called after this code will use y=x^3 instead of y=x^2.
# free the table memory:
my_lut = mbs_data.user_model["my_user_model"]["my_lut_1D"]
my_lut.free()
# Load the new table and assign it
my_lut = MBsysPy.MbsLut1D("../x_pow_3.Lut1D")
mbs_data.user_model["my_user_model"]["my_lut_1D"] = my_lut
# test the new table
value = my_lut.linear_interpolation(2)
# Print the result, should be 8 (=2^3)
print("interpolation of y=x^3 at x=2.0 : {:g}\n".format(value))
If you use the user functions as part of a C-library (advanced
behavior), changing the table can only be done in the main.py
file as follow. And in this case all the simulations started after
this operation will use y=x^3 instead of y=x^2. To change
it in a user function read the C version of this tutorial.
# Loading the mbs file has been done with prj_functions_c="SU" for example
mbs_data = MBsysPy.MbsData("../dataR/my_mbs.mbs", prj_functions_c="SU")
# Create a MbsLut1D instance from the adress stored in the user model
my_lut = MBsysPy.MbsLut1D(pointer=data.user_model["my_user_model"]["my_lut_1D"])
my_lut.free()
# Load the new table and assign it
my_lut = MBsysPy.MbsLut1D("../x_pow_3.Lut1D")
mbs_data.user_model["my_user_model"]["my_lut_1D"] = my_lut
# test the new table
value = my_lut.linear_interpolation(2)
# Print the result, should be 8 (=2^3)
print("interpolation of y=x^3 at x=2.0 : {:g}\n".format(value))
For both approaches, you can also:
Create a look up table by providing
xandyas numpy array to the functionMBsysPy.MbsLut1D.Edit the content of both
xandyvector.
Read the MBsysPy documentation related to the look-up-table for more informations.
2D look up table: Usage
Please note that the look up table must be interpolated in the domain defined by the data points. If called outside the domain the behavior is undefined.
Any function that has MbsData as argument can access to the table
(meaning all user functions of a the project).
Interpolating the table
If you use the user functions as Python modules (default behavior) you access and use the table as follow.
# Retrieve the table instance:
my_lut = mbs_data.user_model["my_user_model"]["my_lut_2D"]
# Interpol the table at x=1.5, y=0.5
value = my_lut.linear_interpolation(1.5, 0.5)
# Print the result
print("interpolation of z=x^2+y at x=1.5 and y=0.5 : {:g}\n".format(value))

# Or alternatively
value = mbs_data.user_model["my_user_model"]["my_lut_2D"].linear_interpolation(1.5, 0.5)
If you use the user functions as part of a C-library (advanced behavior) then:
Write the user function following the C version of this tutorial.
You can access only access and modify the table from the main.py file (as it is the only file written in Python) and use it as follow.
# Loading the mbs file has been done with prj_functions_c="SU" for example
mbs_data = MBsysPy.MbsData("../dataR/my_mbs.mbs", prj_functions_c="SU")
# Create a MbsLut2D instance from the adress stored in the user model
my_lut = MBsysPy.MbsLut2D(pointer=data.user_model["my_user_model"]["my_lut_2D"])
# Interpol the table at x=1.5, y=0.5
value = my_lut.linear_interpolation(1.5, 0.5)
# Print the result
print("interpolation of z=x^2+y at x=1.5 and y=0.5 : {:g}\n".format(value))

# Or alternatively
value = MBsysPy.MbsLut2D(pointer=data.user_model["my_user_model"]["my_lut_2D"]).linear_interpolation(1.5, 0.5)
Changing the table in memory
During the computation you can change the file to be stored in the user model. This requires to firstly delete the current table in memory, and then load and assign the new one in the user model.
It is not required to free the memory of the newly loaded table as it will be freed with the user models.
If you use the user functions as Python modules (default behavior)
just do the following in any of your file. Then all functions
called after this code will use z=x^3+2*y instead of
z=x^2 + y.
# free the table memory:
my_lut = mbs_data.user_model["my_user_model"]["my_lut_2D"]
my_lut.free()
# Load the new table and assign it
# The file must exist.
my_lut = MBsysPy.MbsLut2D("../x_pow_3_plus_2y.Lut2D")
mbs_data.user_model["my_user_model"]["my_lut_2D"] = my_lut
# test the new table
value = my_lut.linear_interpolation(2, 5)
# Print the result, should be 18 (=2^3+2*5)
print("interpolation of z=x^3+2*y at x=2.0 and y=5 : {:g}\n".format(value))
If you use the user functions as part of a C-library (advanced
behavior), changing the table can only be done in the main.py
file as follow. And in this case all the simulations started after
this operation will use z=x^3+2*y instead of z=x^2 + y. To
change it in a user function read the C version of this tutorial.
# Loading the mbs file has been done with prj_functions_c="SU" for example
mbs_data = MBsysPy.MbsData("../dataR/my_mbs.mbs", prj_functions_c="SU")
# Create a MbsLut2D instance from the adress stored in the user model
my_lut = MBsysPy.MbsLut2D(pointer=data.user_model["my_user_model"]["my_lut_2D"])
my_lut.free()
# Load the new table and assign it
# The file must exist.
my_lut = MBsysPy.MbsLut2D("../x_pow_3_plus_2y.Lut2D")
mbs_data.user_model["my_user_model"]["my_lut_2D"] = my_lut
# test the new table
value = my_lut.linear_interpolation(2, 5)
# Print the result, should be 18 (=2^3+2*5)
print("interpolation of z=x^3+2*y at x=2.0 and y=5 : {:g}\n".format(value))
For both approaches, you can also:
Create a look up table by providing
x,yandzas numpy array object to the functionMBsysPy.MbsLut2D.Edit the content of both
xoryvector and of the matrixz.
Read the MBsysPy documentation related to the look-up-table for more informations.