MBsysC
The following instruction will give you the information for the specific software and libraries that you will need to use the C/C++ version of Robotran. However, we do not detail classic parts like the installation of a compiler (because it is implicit within any C/C++ project).
WARNING: MBsysPy is only compatible with 64 bits!
Requirements
To work properly (without real-time features), the two following libraries are required:
MBsysC source code: perform the MBS analyses (See the MBsysPad part of the tutorial)
Libxml2: read the xml files to load your multibody model (.mbs file)
Lapack: perform numerical computations for coordinate partitioning (may be installed already)
If the real-time features are needed, other libraries have to be installed:
SDL 2.0: display graphs and allow interactions (keyboard, joystick,…) in real-time
Java or OpenGL: display a 3D visualization of the system in real-time (OpenGL is the defaut choice)
The Java visualization was developed earlier but seems to be less compatible with modern OS (especially Mac OS since Sierra version). The supporting CAD files are VRML files (.wrl).
The OpenGL visualization was developed at the end of 2016. The supporting CAD files are OBJ files (.obj) and VRML files (.wrl). Some new features are introduced in this version like shadow mapping. As explained here, you might have to update your drivers (but it is usually not necessary).
Moreover you will need Cmake in order to build and compile your project. This software has to be installed for every OS.
Since Robotran v1.26.0 and higher, the required minimum standard
compiler norm for MBsysC is C++11. Please contact
info@robotran.be in case of trouble.
For MacOS you need to follow the following steps.
Installation of Command Line Tools
Running Robotran C code on MacOS requires the Command Line Tools available using XCode. We highly recommend to install XCode. However, if you do not want to install it (several Gb), an alternative is described here. To do so, you also need to go here and search for Command Line Tools. Then, download the one corresponding to your OS version (a .dmg file).
Installation of Cmake
To install CMake, go here. Since Robotran v1.26.0, Cmake minimum version is 3.11.
First, install the Gui interface by dowloading either the Mac OS .dmg file or the archive cmake-x.x.x-Darwin-x86_64.tar.gz from Binary distributions. In the second case, decompress it and put CMake in your Applications folder.
Secondly, install the Terminal tools (being able to run CMake from the Terminal). Download cmake-x.x.x-.tar.gz from Sources Distributions for Unix/Linux Sources. Then, decompress it and open the Terminal (in Applications/Utilities).
Go inside the decompressed folder and run the classical Terminal install commands:
cd cmake-x.x.x
./configure
make
sudo make install
Installation of the libraries
Lapack
Lapack should be installed on your computer already.
If it is not the case, you will have to install it. For instance, you
can install Homebrew (https://brew.sh). Then Lapack can be installed
via the command brew install lapack
LibXml
To install LibXml 2, you can go here (Watch out ! This web link is not working on Safari browser) and download the latest libxml2-x.x.x.tar.gz. Then, run the classical Terminal install commands.
Later, when you configure the project with CMake, check the includes
INC found for Libxml2. One of them should finish with /libxml.
If this is not the case and the libxml headers are located inside
/usr/bin/libxml 2.framework/Headers, then create a folder
libxml in /usr/bin/libxml 2.framework/Headers and copy all
the headers of /usr/bin/libxml 2.framework/Headers inside
/usr/bin/libxml 2.framework/Headers/libxml.
SDL
SDL is optional. It is required if you want to draw plots while running simulation.
To install the SDL tools, there are two methods. We advise you to use the first one, which is easier to configure.
The first method is to download SDL2-x.x.x.dmg, found here in Runtime Binaries, to run it and to place SDL2.framework inside /Library/Frameworks/. In a similar way, do the same with SDL2_ttf-x.x.x.dmg found here in Runtime Binaries.
For the second method, you need to install three components, all using the classical installation way:
freetype-x.x.tar.gz (take the last version) found here
SDL2-x.x.x.tar.gz found here
SDL2_ttf-x.x.x.tar.gz found here (FreeType installation required)
OpenGL
OpenGL is optional. It is required if you want to draw 3D animation while running simulation.
First, install GLM by going here and download the source code (tar.gz). Then, use the following commands:
cd glm-x.x.x.x
mkdir build
cd build
cmake ..
make
sudo make install
Then, install GLEW by going here and download the last GLEW version. Use then the following lines:
cd glew-x.x.x
make
sudo make install
Finally, install GLFW3 by going here and click on the Download GLFW button. Then, use the following lines:
cd glfw-x.x.x
mkdir build
cd build
cmake ..
make
sudo make install
Java (not mandatory)
Using this link, download jdk-8uxx-macosx-x64.dmg, execute it and follow the instructions.
Compilation of the “User file generation” application and the MBsysC modules
The User file generation application enables to generate automatically user model files and the header containing element id (body id, joint id, …). This application is independent of any project and has to be compiled when installing or updating MBsysC. The compilation of this application is mandatory to use all Robotran functionality.
The compilation of the MBsysC modules will confirm that all requirements are met. Compiling the modules allows you to enable the separate build compilation option on project. This option allows you to avoid compilation of all the source code for each project. This is not the default behavior.
Compiling in terminal
Open a terminal in the “MBS path”/MbsFiles/mbsysc/MBsysC folder and run the following commands:
mkdir build            # create a folder named build
cd build               # go in build folder
cmake .. -DCMAKE_INSTALL_PREFIX="../install"       # generate a Makefile
make install -j                                    # build the project
Various
How to get and use development version
The development version of MBsysC is maintained on our gitlab website. This project is accessible to everyone.
WARNING:
The development version is not stable, it could give wrong results. Moreover the project template (the user files, the CmakeLists.txt …) could be different from the one provided by MBsysPad when you created your project. This can prevent the project compilation.
To use this version:
Download the gitlab project;
Extract the downloaded file;
Copy the contents of /MBsysC folder where you want (do not replace the content of “MBS path”/MbsFiles/mbsysc/MBsysC folder);
Compile the MBsysC modules and the “User file generation” application;
Update the source path, either for all new project or for a specific project;
You can delete the rest of downloaded files.
Updating source path for all new project
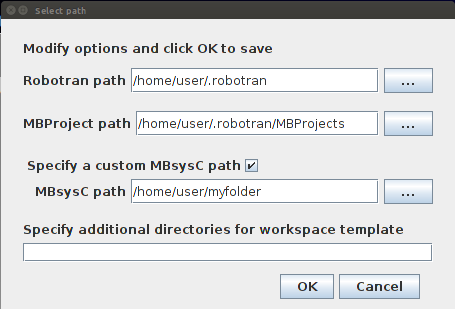
Go to Tools and select Edit preferences. Check the box “Specify a
custom MBsysC path” and put in the text box unlocked the path to your
MBsysC folder. The path should stop before MBsysC, it should look
like C:/Users/username/Documents/mbsysc (for windows, assuming
MBSysCis here C:/Users/username/Documents/mbsysc/MBsysC/). To
check if your path is correct, copy-paste it the address bar of your
file explorer, you have to see the contents you just copy.
Setting MBsysC source path to a specific MBsysC version
After this operation all new created project will use the version of MBsysC you specified. For older project you will have to update manually the sources (see hereafter).
Updating source path for a specific project
You can update the sources of a project manually in different ways.
First way, by editing the CmakeLists.txt of your project: set the
variable CMAKE_PREFIX_PATH to the path to the development version.
For
example:set(CMAKE_PREFIX_PATH /home/user/my_mbsysc_folder/install).
Then compile you project as usual. This way is not recommended.
Second way, by the cmake gui interface: set the variable
CMAKE_PREFIX_PATH to the path to your MBsysC/install folder
(included in the path). Then compile you project as usual.
Third way, by the unix terminal: after the command cmake .., set
the variable CMAKE_PREFIX_PATH to the robotran source directory
with the following command
cmake .. -DCMAKE_PREFIX_PATH=/home/user/my_mbsysc_folder/install.
Then compile you project as usual.
REMARK:
If you delete and then recreate the build folder (or clean it) the modification of the source is only permanent if the modification has been done in the CmakeLists.txt.
How to modify MBsysC
If you need to adapt MBsysC to your project, copy-paste the “MBS path”/MbsFiles/mbsysc folder or the development version to another location and make your modifications. Then update the path to the sources for your project.
If your modifications could be useful to multiple users, you can share them with the community either by contacting us or via the iMMC gitlab website (you will need to ask specific access to create a fork for your modifications).
How to use add-on
We have to choose how to handle addons.