Ros_rasp
This is a ROS package which receives/publishes data for a Robotran project. Running this package alone has no interest. The objective here is to run the ros_rob (see tutorial and information here) and the ros_rasp packages simultaneously on two devices (which have ROS installed on it and a complete, bi-directional connectivity through SSH communication), for example a computer and a Raspberry Pi.
Here especially is an example where you can drive a car with the left and right keyboard arrows and, thanks to a ROS topic, publish the torque which will be applied in the steering wheel. Now you are able to publish data to Robotran from an external device and also receive data from Robotran to this external device.
Installation and configuration of ROS
To install ROS we suggest you to follow the official ROS Tutorials: the Installation and Configuration is mandatory. After that, in order to have a better comprehension and management of ROS, you can follow all the beginner level and Writing a simple publisher/subscriber.
You can download the ros_rasp package here.
NOTE:
This ROS package and the following tutorial has been written for a Raspberry Pi2 Model B which runs under Ubuntu Mate.
The ROS version used here is Melodic and the ROS compiler is catkin. The nodes are written in C++.
Network Setup between the two devices
This is one of the strengths of ROS, a ROS node makes no assumptions about where in the network it runs if there is a complete, bi-directional connectivity between all pairs of machines and if each machine can advertise itself by a name that all other machines can resolve.
The example here shows how to create an SSH communication between a computer with Ubuntu and a Raspberry Pi2 Model B with Ubuntu Mate connected by an Ethernet cable. So this section may vary in function of your network configuration but you can do it by your own with some researchs on internet. The purpose is to obtain the complete, bi-directional connectivity between the devices. This ROS tutorial will allow you to check that and gives you some issues if you have any problems with the connection.
- Install SSH client and server on the two devices:
$ sudo apt-get install openssh-server openssh-client - Create a fixed IP address for Ethernet connection of the laptop.
- Go to Parameters->Network and check the wired connection.
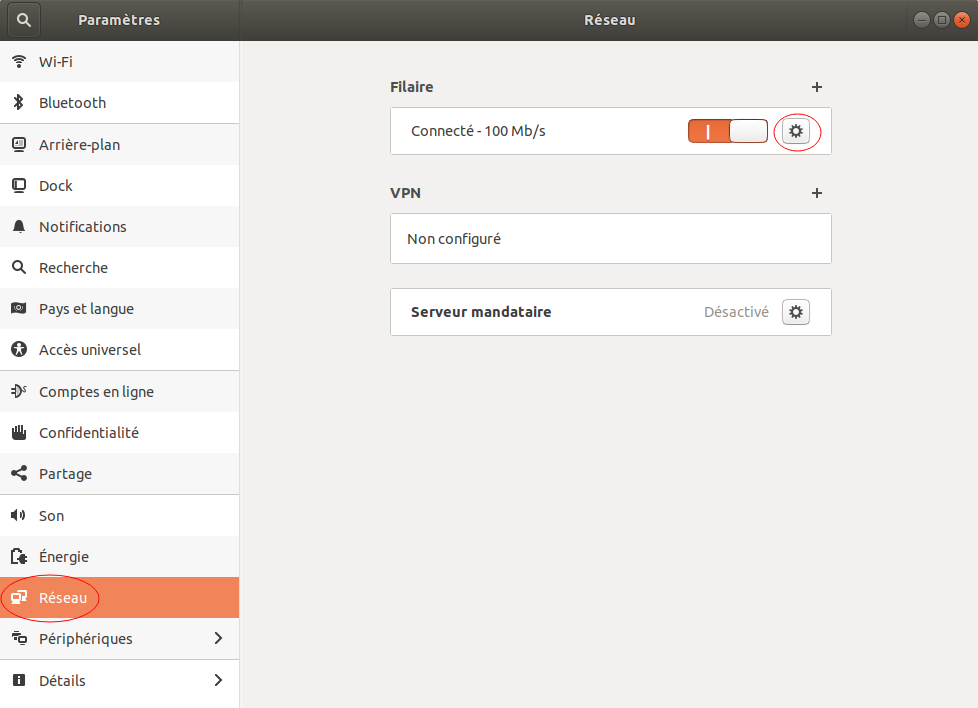
- Select Make it accessible to other devices
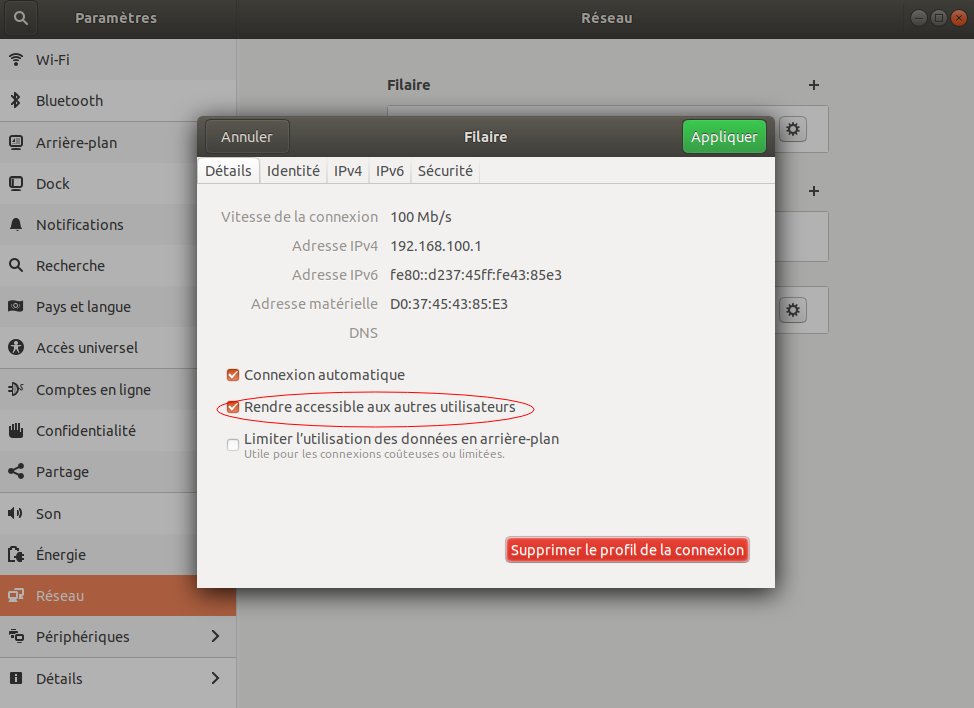
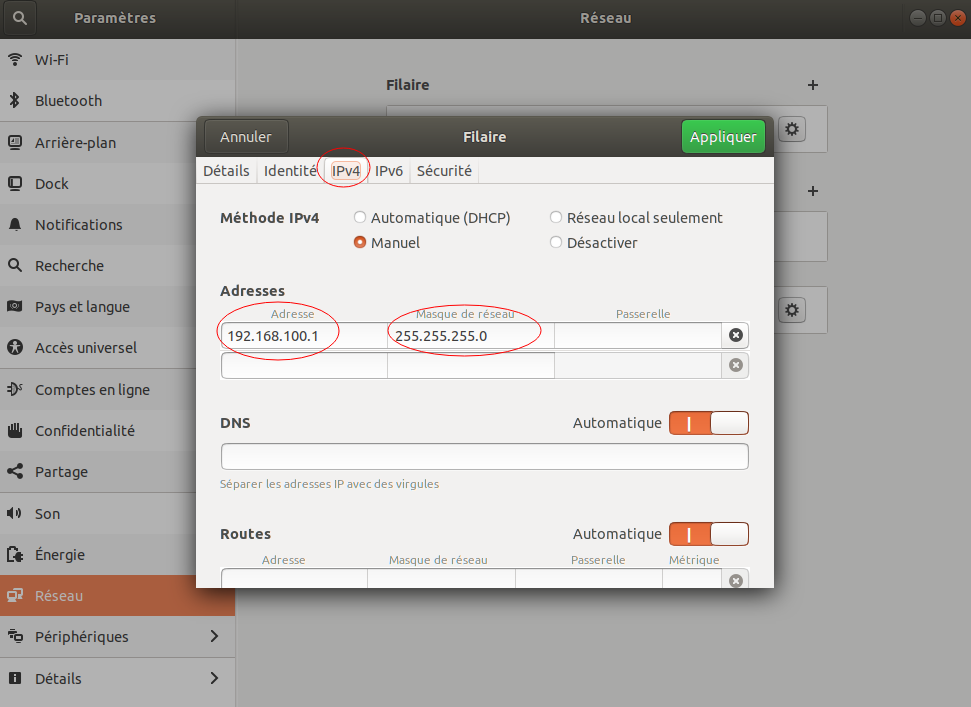
- Then in the IPv4 section, set the IP address to 192.168.100.1
(you can choose the value what you want but you need to keep it in
mind) and set the netmask to 255.255.255.0 (this address must be
the same for all the devices in the network).
- Create a fixed IP address for Ethernet connection of the Raspberry Pi.
You can edit the /etc/network/interfaces file with:
auto lo
iface lo inet loopback

auto eth0
iface eth0 inet static
address 192.168.100.2
network 192.169.100.0
netmask 255.255.255.0
broadcast 192.168.200.255

allow-hotplug wlan0
iface wlan0 inet manual
wpa-conf /etc/wpa_supplicant/wpa_supplicant.conf
Note that the netmask address is the same and keep in mind the IP address 192.168.100.2
If you want to return to a classical Ethernet communication just change static by dhcp and put all the addresses in comment.
- If not done, enable SSH on the Raspberry. By typing
$ sudo raspi-configand then go the Interfacing Options and enable SSH or with the command line$ sudo update-rc.d ssh enable && invoke-rc.d ssh start - (Optional) You can put a name on the IP address in order to use it in a more simple way.
Just add lines with the IP address and the name that you want (you need to use the same names used here or you will have to make some changes in the launch_haptic_simulator.py file) in the /etc/hosts file of the two devices (you need to have admin rights):
192.168.100.2 raspberry_ethernet 192.168.100.1 laptop_ethernetRestart the network on the laptop in order to take the changes in account:
$ /etc/rc.d/init.d/network restart
Reboot the laptop and the Raspberry.
Reconfigure the SSH of the Raspberry:
$ sudo dpkg-reconfigure openssh-serverSometimes the fire-wall of the computer can make obstruction in the communication between the two devices. You can disable the fire-wall with (need to be done at each boot):
sudo iptables -Fsudo iptables -Xsudo iptables -t nat -Fsudo iptables -t nat -Xsudo iptables -t mangle -Fsudo iptables -t mangle -X
Now the connection is established, you can verify that there is a full bi-directional connectivity between the two devices. This ROS tutorial will allow you to do that and gives you some issues if you have any problems with the connection.
(Optional) We can also increase the robustness of the connection and create an authorized-key on the laptop:
- Create an ssh-key on the laptop:
ssh-keygen -t rsa - Enter the file in which the key will be saved and a passphrase if you want.
- Copy the public key into the new machine’s authorized_keys file, for
our example it will be:
ssh-copy-id -i <path-to-the-file-created-at-point-2> <user_name>@192.168.100.2
ROS across multiple machines
Now that you have a SSH connection between your two devices (here a laptop and a Raspberry), we are going to setup the ROS environment. When you run ROS across multiple machines you only need one master, all the other devices are slaves. But the nodes running on slave device must be configured to use the same master. In order to do that we are going to modify the .bashrc file of our device.
For this example:
one master device, here the laptop (IP address = 192.168.100.1 named laptop_ethernet)
one slave device, here the Raspberry (IP address = 192.168.100.2 named raspberry_ethernet)
Modify the .bashrc file of the master by adding these lines at the end:
source /opt/ros/melodic/setup.bash
source $HOME/catkin_ws/devel/setup.bash

export ROS_HOSTNAME=laptop_ethernet
export ROS_MASTER_URI=http://laptop_ethernet:11311

echo "ROS_HOSTNAME :"$ROS_HOSTNAME
echo "ROS_MASTER_URI :"$ROS_MASTER_URI
Remark:
- echo prints the addresses and allows you to verify the addresses when you open a new terminal.
- source allows to take in account in the ROS environment the modification of the .bashrc file when you open a new terminal.
Modify the .bashrc file of the slave by adding these lines at the end:
source /opt/ros/melodic/setup.bash
source $HOME/catkin_ws/devel/setup.bash

export ROS_HOSTNAME=raspberry_ethernet
export ROS_MASTER_URI=http://laptop_ethernet:11311

echo "ROS_HOSTNAME :"$ROS_HOSTNAME
echo "ROS_MASTER_URI :"$ROS_MASTER_URI
Note:
The ROS_MASTER_URI address is the same for the two devices.
Compilation and run instructions
Now that the network and the ROS environment are setup, here are the compilation and run instructions:
- Follow this tutorial for installing and compiling the ros_rob package on the computer (don’t run it).
- Download this package ros_rasp in your catkin_ws/src folder in the Raspberry.
- Go to the catkin_ws folder et compile/build it with:
~/catkin_ws$ catkin_make - Run
$ roscoreon the master device (here the computer). - On the Raspberry, run the talker node which sends the position and
the velocity of the steering wheel to Robotran on the computer and
run the listener node which receives the torque of the steering
wheel with
$ rosrun ros_rasp talkerand$ rosrun ros_rasp listener. - On the laptop, run the exe_Car node which runs the real-time simulation in Robotran, receives the position and velocity of the steering wheel from the talker node and publishes the torque on a topic for the listener node.
- The exe_Car node close automatically. Close the listener and
talker node and roscore by pressing
ctrl+Cin each terminal.